


How to Measure Mercury Throttle & Shift Control Cables
.JPG/v1/fill/w_320,h_320/file.jpg)
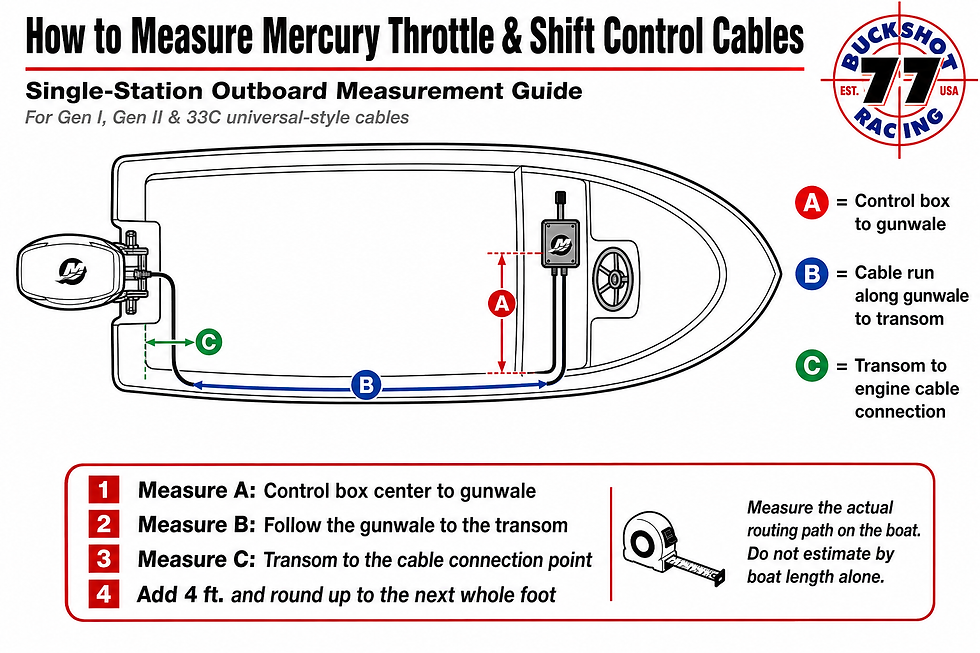
Mercury Gen I, Mercury Gen II & Universal 33C Control Cable Guide
Whether you are replacing cables on a classic Mercury Black Max, XR, XRi, Laser EFI or Pro Max, rigging a later mechanically controlled Mercury or Optimax, or building a performance boat with a foot throttle and separate shifter, measure the actual cable-routing path rather than the length of the boat.
The same basic measuring method applies to Mercury Gen I, Mercury Gen II and universal 3300/33C control cables, but choosing the correct cable end style is just as important as choosing the correct length.
Method 1: Measure the Actual Cable Routing
For a new outboard installation, measure from the cable attachment point inside the throttle/shift control along the exact route the cables will follow to the centerline of the outboard engine.
Think of the measurement as three sections. Measure from the control box down to the gunwale or rigging tunnel, continue along the actual under-deck or gunwale route to the transom, then measure from the transom routing point to the center of the engine.
Follow the path the cable will actually take through bulkheads, rigging tubes and compartments. Do not simply measure straight from the dashboard to the transom.
For most outboard installations, add 4 feet to this routing measurement to provide the engine-end loop required for unrestricted steering, trim and tilt movement.
The basic formula is: Control to Engine Routing Length + 4 Feet = Control Cable Length
Round the final measurement up to the next whole foot.
For example, if the actual control-to-engine route measures 13 feet 5 inches, adding four feet produces 17 feet 5 inches. Select an 18-foot control cable.
Normally, the throttle and shift cables follow the same route on a single-engine outboard, so that both cables will be ordered in the same length.
Why the Extra Four Feet Matters
The additional four feet is not simply excess cable. An outboard pivots from port to starboard and also travels through a substantial arc when trimmed or tilted. The throttle and shift cables must accommodate this movement without pulling against the engine linkage or developing a sharp bend at the transom.
A smooth engine-side loop allows the cables to move with the motor while maintaining proper throttle and shift adjustment.
Sharp bends should be avoided throughout the installation. Dometic specifies approximately a 4-inch minimum bend radius for Xtreme-style cables and approximately 8 inches for many standard 3300/33C and OEM-style cables. Multiple tight bends increase cable effort and can produce throttle friction, difficult shifting and lost motion at the engine.
Mercury Gen I Control Cables
Mercury Gen I, commonly called the 600A-style Mercury cable, is the traditional Mercury/Mariner control cable configuration used across decades of mechanically controlled Mercury outboards and MerCruiser applications.
Dometic identifies the CC179 / CCX179 family as the Mercury Gen I or 600A-series cable.
This cable style is commonly encountered on classic Mercury two-strokes including many 2.0L, 2.4L and 2.5L V6 applications such as Black Max, XR2, XR4, XR6, Laser EFI, XRi, Pro Max and numerous Mercury Racing installations using traditional Mercury controls.
Engine model alone should not determine cable selection because control boxes and rigging are frequently changed during a boat's life. Verify the fittings at both the control and engine ends before ordering.
Mercury Gen II Control Cables
Mercury Gen II uses a different cable-end configuration and was developed for Mercury's later mechanical remote-control systems. Dometic identifies CC189 / CCX189 as the Mercury Gen II cable and specifically associates it with Mercury 4000-series Gen II controls.
Gen II cables are commonly found on later Mercury and MerCruiser mechanical-control installations, including many applications from the early 2000s forward.
A Gen II cable should not be ordered simply because an engine is newer. Mercury used overlapping control configurations, and boats are frequently repowered while retaining earlier controls. Inspect the existing cable ends or locate the part number printed on the cable jacket.
Universal 3300/33C Control Cables
The 3300/33C universal control cable is one of the marine industry's most widely used throttle and shift cable designs. Standard 33C cables typically use 10-32 threaded terminals at both ends, allowing them to work with a broad range of aftermarket controls, foot throttles, race shifters and engine adapter kits.
Universal 33C cables are particularly useful on performance bass boats, tunnel boats, drag boats and offshore boats where the installation may use a Hot Foot-style throttle, separate shifter or custom race control rather than a factory Mercury control box.
A 33C cable is not automatically a direct replacement for a Mercury Gen I or Gen II cable. Depending on the control and engine, the installation may require the proper Mercury cable-end adapter or connection kit. Uflex, for example, specifies an adapter kit when its universal 33C-style cable is used in certain Mercury Gen I installations.
Method 2: Measure the Existing Cable
When replacing cables that already fit correctly, the easiest method is usually to identify the manufacturer and length printed on the existing cable jacket.
On many Dometic/SeaStar cables, the final two digits of the part number represent the cable length in feet. A CCX17918, for example, identifies an 18-foot Mercury Gen I Xtreme cable.
If the markings are no longer readable, remove the cable, lay it out naturally and measure it from tip to tip. Round up to the next available whole-foot cable length.
Do not automatically duplicate an old cable if the previous installation contained tight bends, stretched engine loops or excessive cable coiled under the dashboard. Re-rigging is an opportunity to correct an improper installation.
Buckshot Racing #77 High-Performance Rigging Tip
After installing the new throttle and shift cables, leave them disconnected from the final engine adjustment until the routing is correct. Turn the outboard completely from port to starboard, then trim and tilt it through its full required range.
Watch the cable loop at the motor. Neither cable should become tight, kink, rub heavily against another component or place side-load on the throttle or shift linkage.
Once routing is correct, adjust the shift cable first according to the Mercury service procedure, making sure the engine and control are positively in neutral. Then adjust the throttle cable so the throttle linkage returns completely to its idle stop without preloading the linkage.
On high-performance Mercury engines, cable adjustment deserves particular attention. An incorrectly adjusted throttle cable may prevent the throttle from reaching full travel or may hold the linkage slightly open at idle. Incorrect shift-cable adjustment can prevent full clutch-dog engagement and accelerate gearcase wear.
Choosing Between Gen I, Gen II and 33C
Choose a Mercury Gen I / 600A cable when the control and engine use the traditional Mercury Gen I connections. Choose a Mercury Gen II cable when the installation uses Mercury Gen II/4000-series mechanical-control connections.
Choose a 3300/33C universal cable when the control system uses standard 10-32 threaded cable ends or when a custom race-control installation uses the appropriate Mercury adapter hardware.
The correct cable therefore requires two measurements: cable type and cable length.
For an outboard, measure from the control connection through the actual boat routing to the centerline of the engine, add four feet for the engine loop, and round up to the next whole foot. Then verify whether the installation requires Mercury Gen I, Mercury Gen II or universal 33C ends.
Measure the routing—not the boat. Identify the cable ends. Add room for engine movement. Measure twice and order once.


Comments